This function enables the importing of Custom CSV Format Invoices for each Supplier that uses a Custom CSV Format.
This is achieved by selecting a Supplier, then selecting a CSV File to import.
Each column in the CSV File then needs to be manually mapped to a field in Idealpos, and once completed, the field mappings can be saved as Default for the Supplier.
Each time an Invoice is imported from the Supplier, the columns in the Supplier Invoice will be mapped to the Idealpos fields.
The field mapping options that are selected are specific to each Supplier (as each Supplier will have their own CSV Invoice format, this manual field mapping process needs to be repeated for each Supplier that you import a Custom CSV Invoice).
To skip to a particular step, click on the required link below.
If configuring a new Supplier, complete the process in the order listed below:
Create and configure a Supplier
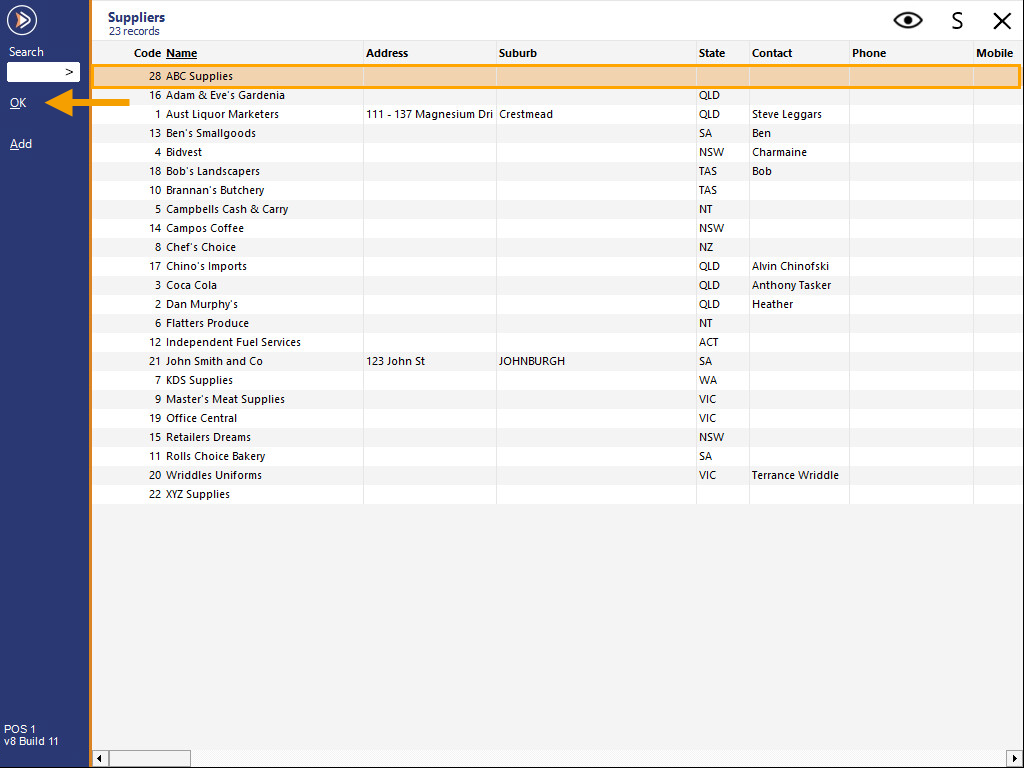
To use this function, go to: Back Office > File > Suppliers > Suppliers.
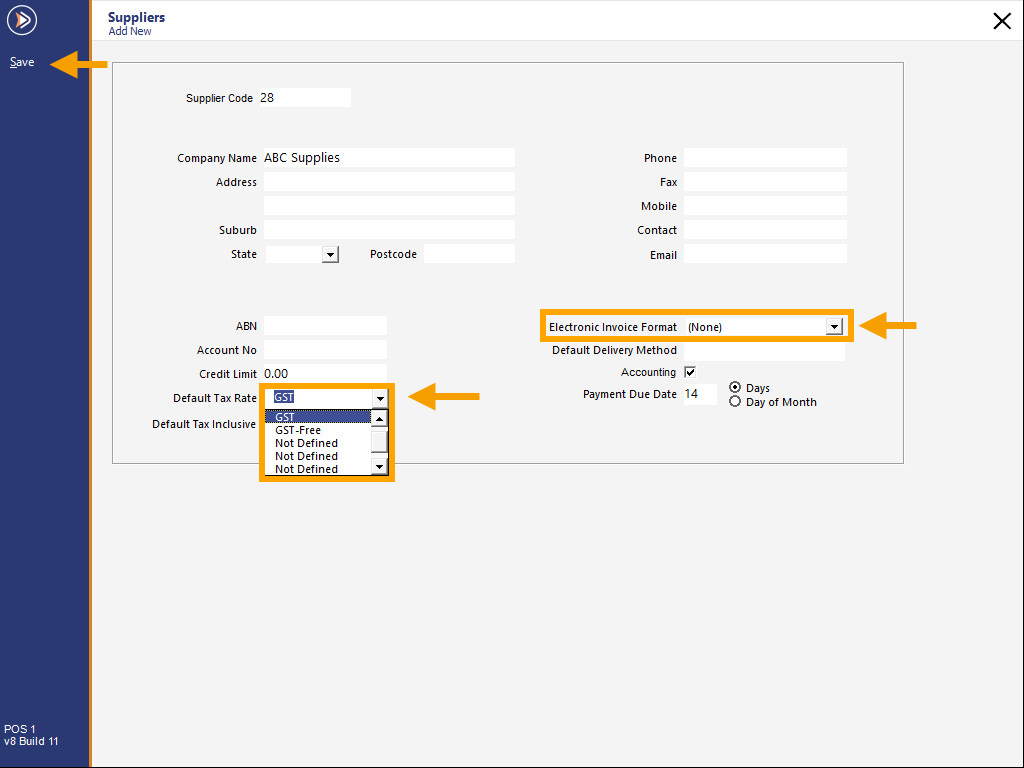
Select the Supplier > Modify.
Alternatively, create a new Supplier by pressing 'Add' > Enter Supplier Details.
Whether modifying or creating a new Supplier, ensure that the settings are configured as follows:
Default Tax Rate - Set the Tax Rate according to the Supplier.
Electronic Invoice Format - (None). This must be set to None to Import Custom CSV Formats by Supplier.
Once configured accordingly, press 'Save' on the top-left corner of the window to save the Supplier and close the Supplier windows.
Mapping the fields in the Supplier Invoice
Go to: Back Office > Transactions > Stock Control > Stock Purchases.
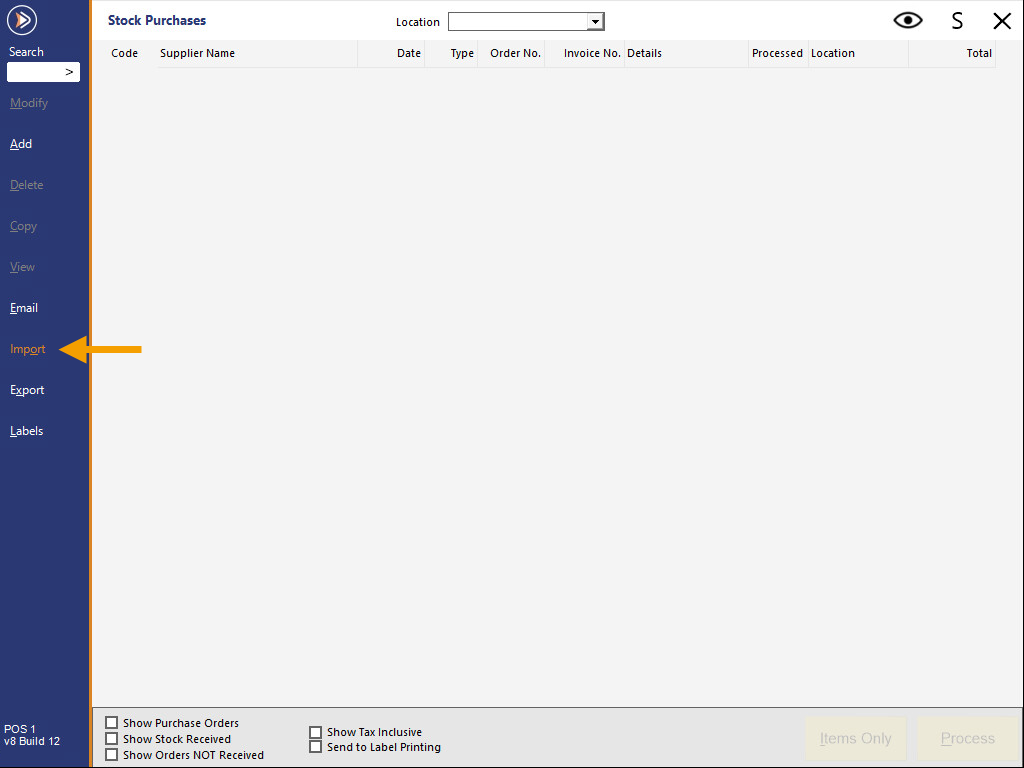
Select 'Import'.

Press '>' in the Supplier field to select a Supplier.

Select a Supplier from the list > OK.
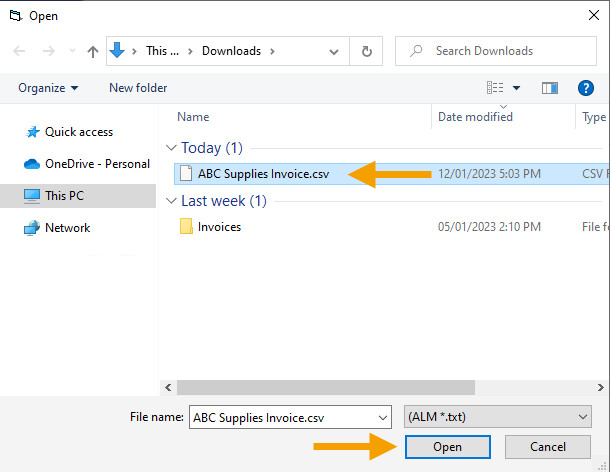
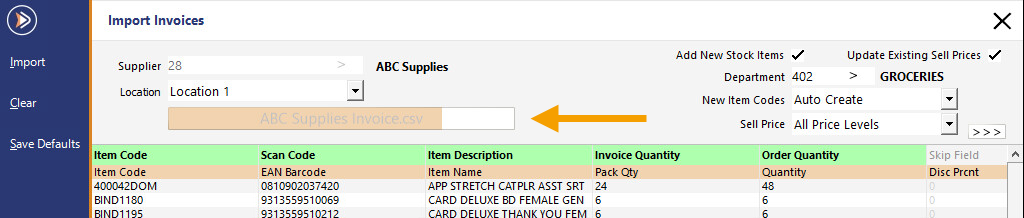
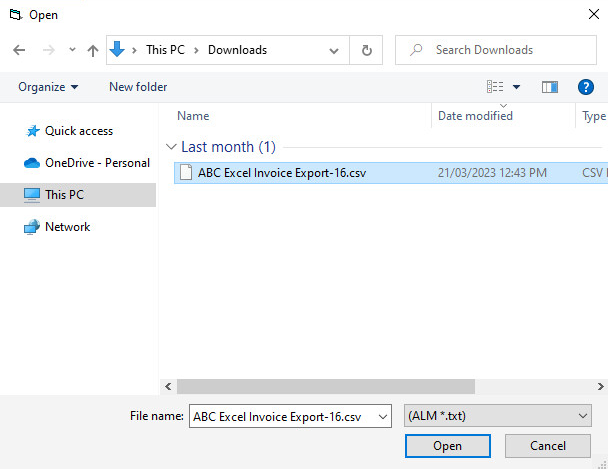
Press 'Select Import File'.

Browse to the folder location and select the Invoice > Open.
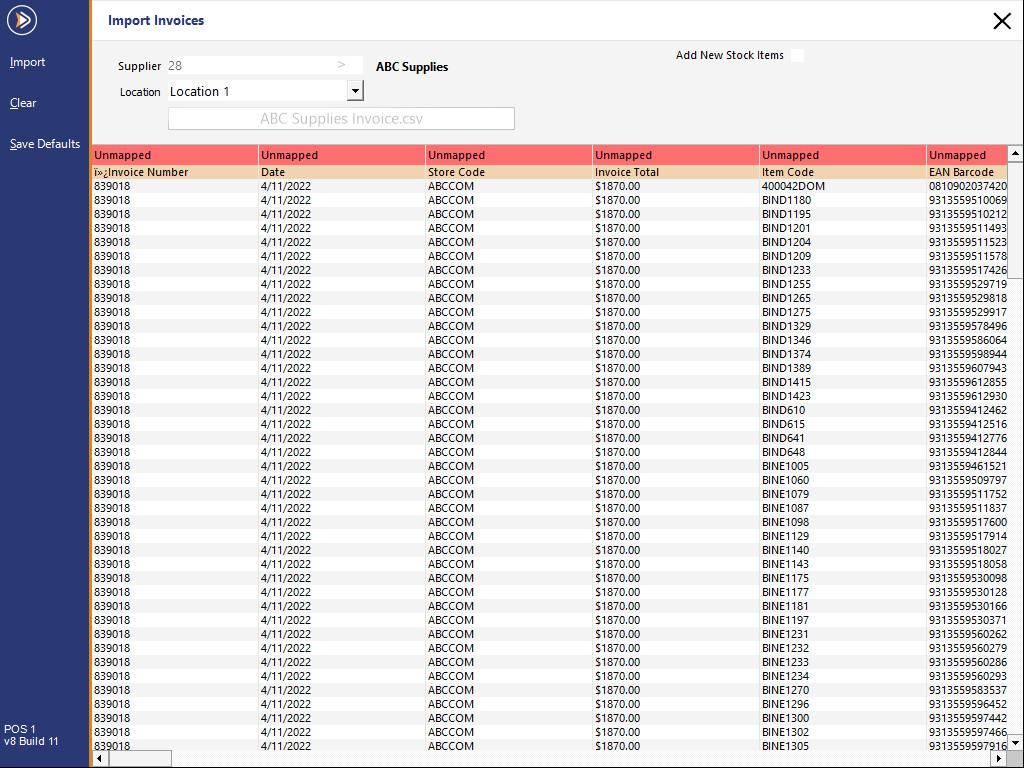
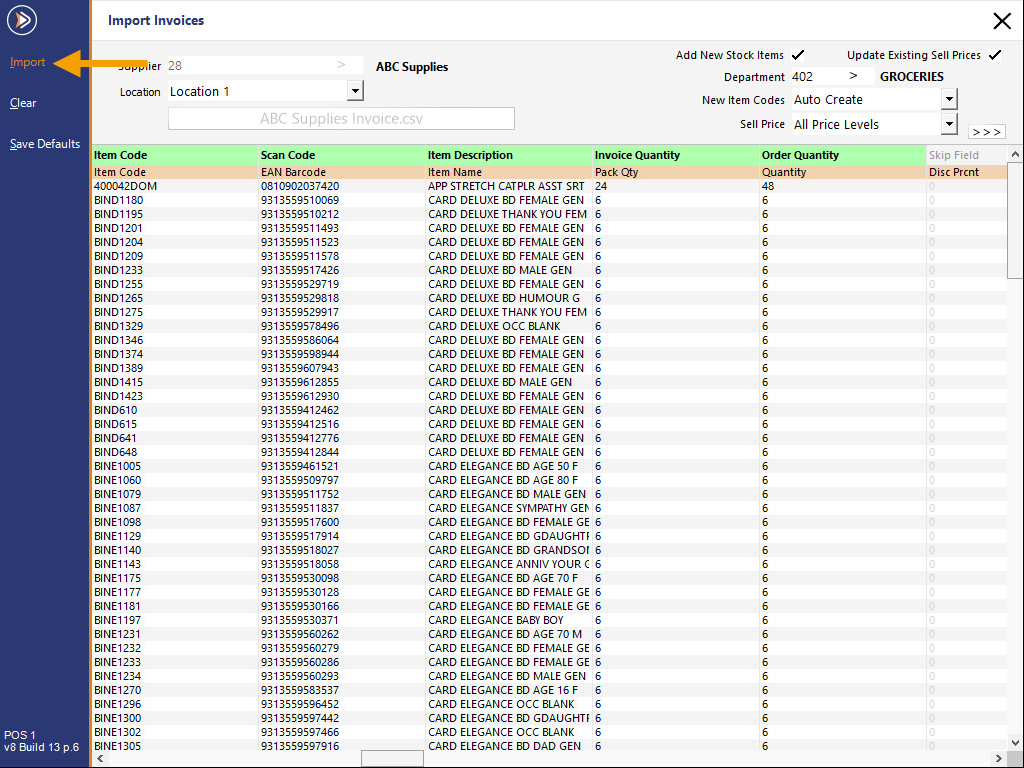
The Invoice is displayed in the Import Invoices window.
If required, enable the 'Add New Stock Items' option.
This will trigger Idealpos to Add New Stock Items from the Invoice that don't already exist in your system.
The Tax Rate for each Stock Item that is created during the Invoice Import will be set the same as the Default Tax Rate that was configured for the Supplier of the Invoice.
When enabling 'Add New Stock Items', the following options will need to be configured:
Update Existing Sell Prices - Enabling this option will trigger Idealpos to update the Existing Sell Prices of any Stock Items from the Invoice that already exist in the Idealpos database. This option is only available when the 'Add New Stock Items' option is checked. The Sell Prices will be updated as per the Price Level selected in the Sell Price dropdown box.
Department - Stock Items that are added will be linked to the specified Department. Press the '>' button in this field to display a list of Departments and select the Department to link to new Stock Items created during the Invoice Import.
New Item Codes - Three options are available as follows.
Auto Create - Stock Item Codes are automatically created for each new item that is added.
Supplier's Code - Each new Stock Item that is added will use the Supplier's Code from the Invoice.
Supplier's Code + Suffix - Each new Stock Item that is added will use the Supplier's Code from the Invoice and the Suffix that is entered into the Suffix field (when this option is selected, a Suffix field will appear to the right-side of the dropdown box where a custom Suffix can be entered).
Sell Price - Thirteen options are available (All Price Levels or select from one of the twelve Price Levels).
This option will specify which Price Levels are to be populated with the Stock Item's Sell Price.
Note that Invoices can only specify a single Sell Price for each Stock Item, which means if 'All Price Levels' are selected, all Price Levels will be populated with the same Sell Price.

Each field/column in the Invoice must be mapped to an Idealpos field.
Each column on the first row of the Invoice will display 'Unmapped'.
To map the values in each column, click on the 'Unmapped' text and a dropdown list will be displayed.
Select the option which corresponds to the data that appears in that column below.
Note that not all fields in a Supplier Invoice will be supported or required by Idealpos.
In such cases, select the 'Skip Field' option.
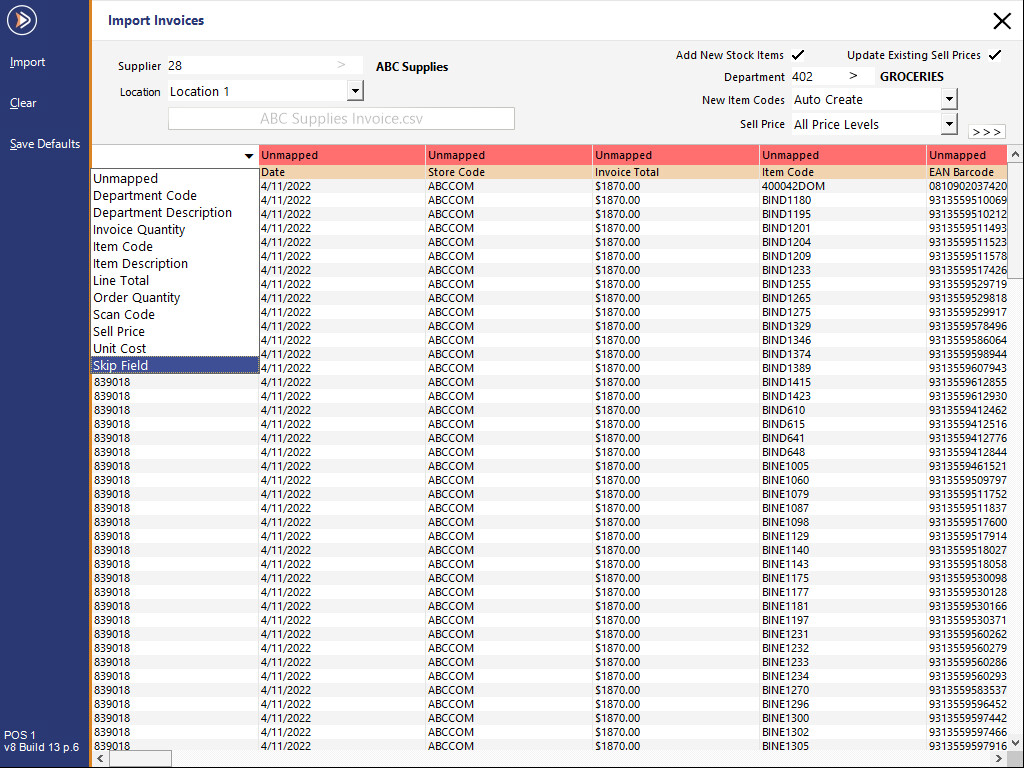
When skipping a field, the contents of the column will appear as greyed out and the header will display 'Skip Field'.
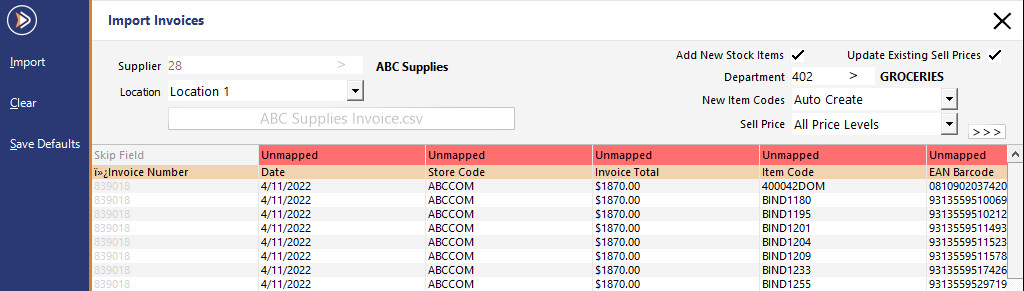
Ensure that each column in the Invoice is mapped according to the data that appears in the column.
Once completed, press the 'Save Defaults' option on the top-left corner of the Import Invoices window.
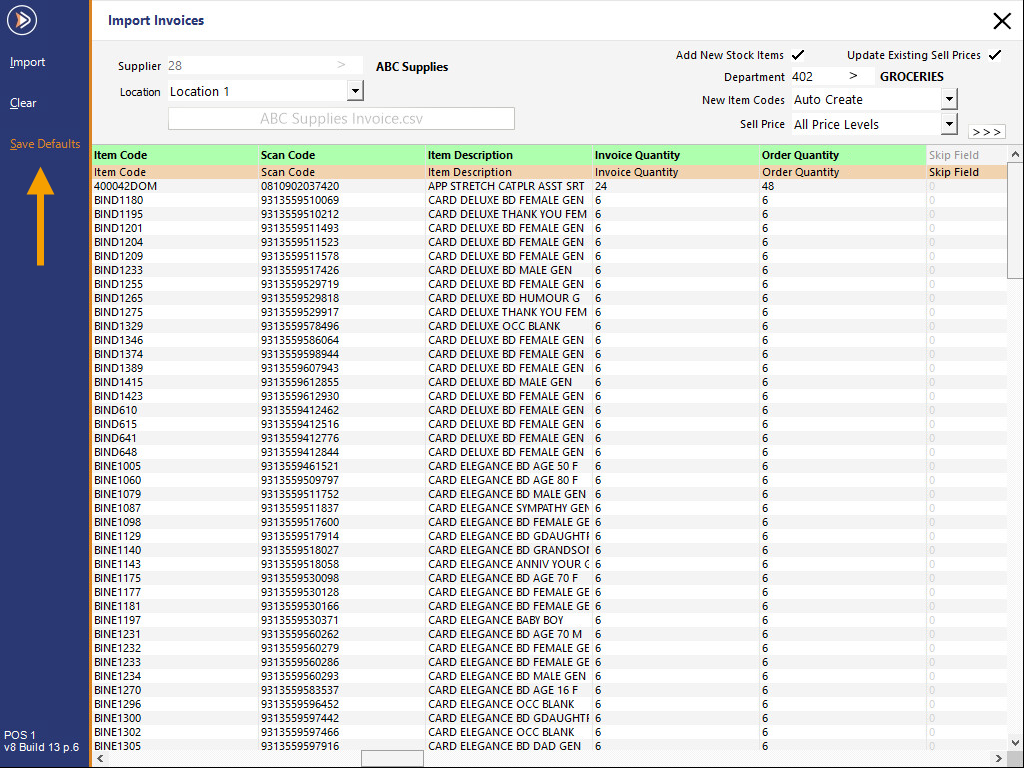
A 'Defaults Saved' prompt will appear to confirm that the Defaults were saved successfully > Press 'OK'.

The next time this Supplier is chosen, and an Invoice file selected, the field mappings will be used to link the Invoice fields to the Idealpos fields, enabling the data to import correctly.
Select the 'Import' button on the top-left corner of the Import Invoices window to Import the Invoice into Idealpos.
During the Import process, a light orange progress bar will appear within the Invoice Filename button.
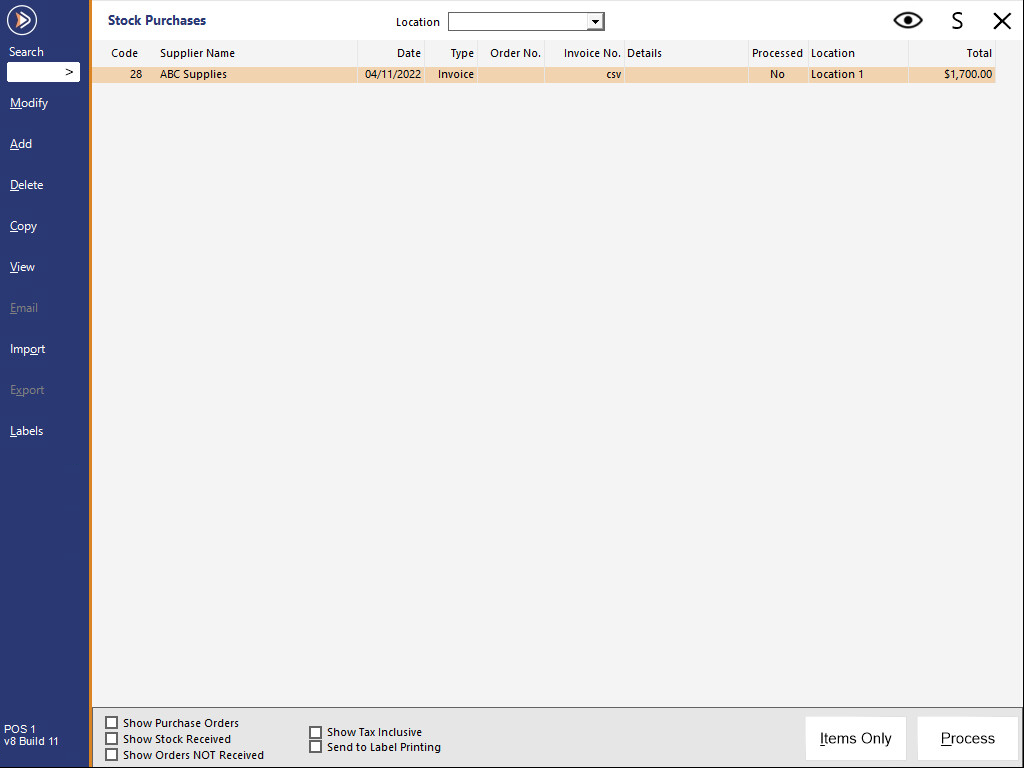
After the Import has been completed, the Import Invoices window will close, and the Stock Purchases window will appear, displaying the newly imported Invoice.
Select 'Modify' to view the Invoice details and make any required changes.

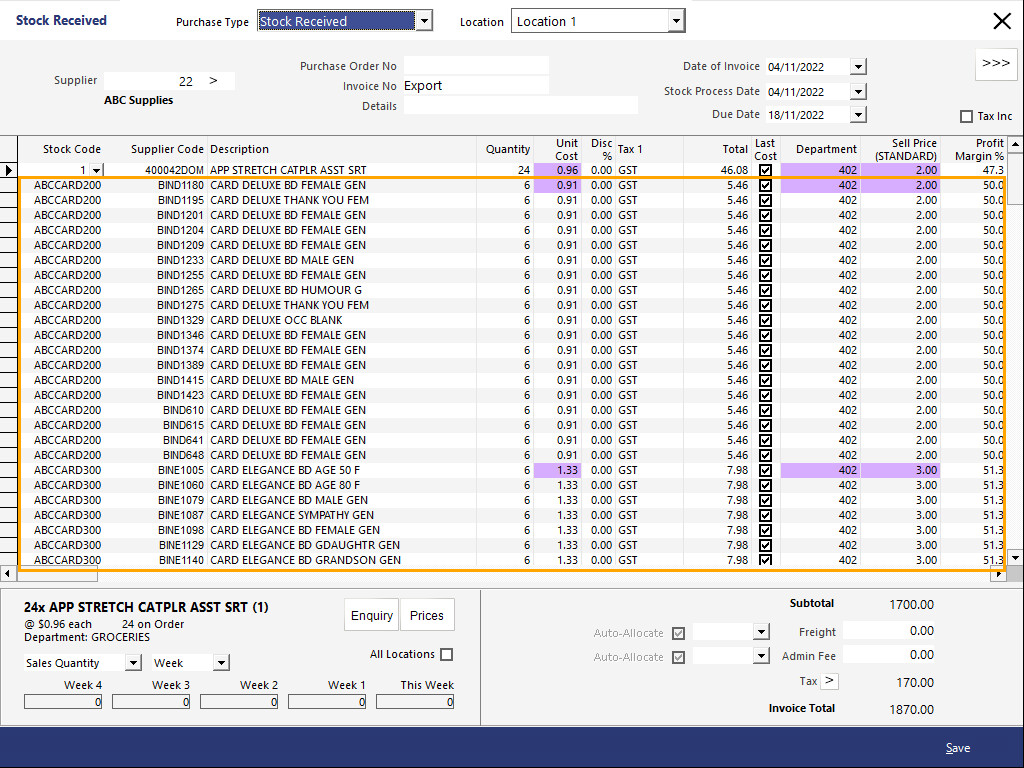
Any new items which have been created will have the Unit Cost highlighted in purple.
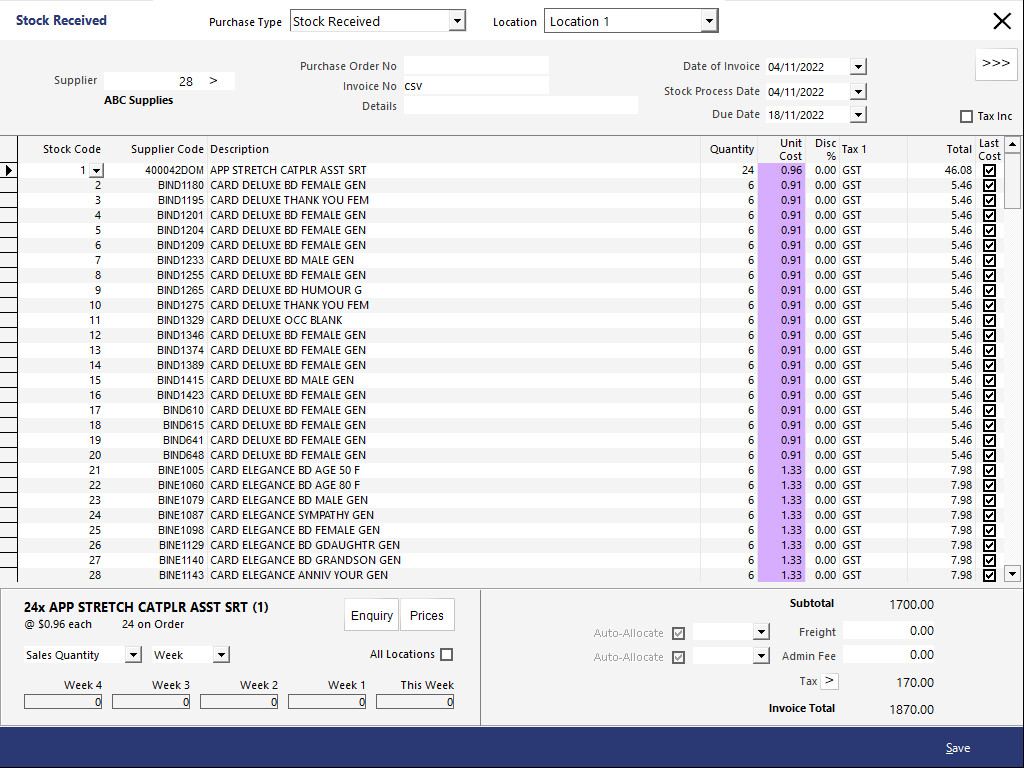
An Invoice Number can be manually entered into the 'Invoice No' field and any other changes made as required.
Press 'Save' to save any changes made.

Ensure that the Invoice is selected/highlighted, then process the Invoice by pressing the 'Process' button on the bottom-right corner.
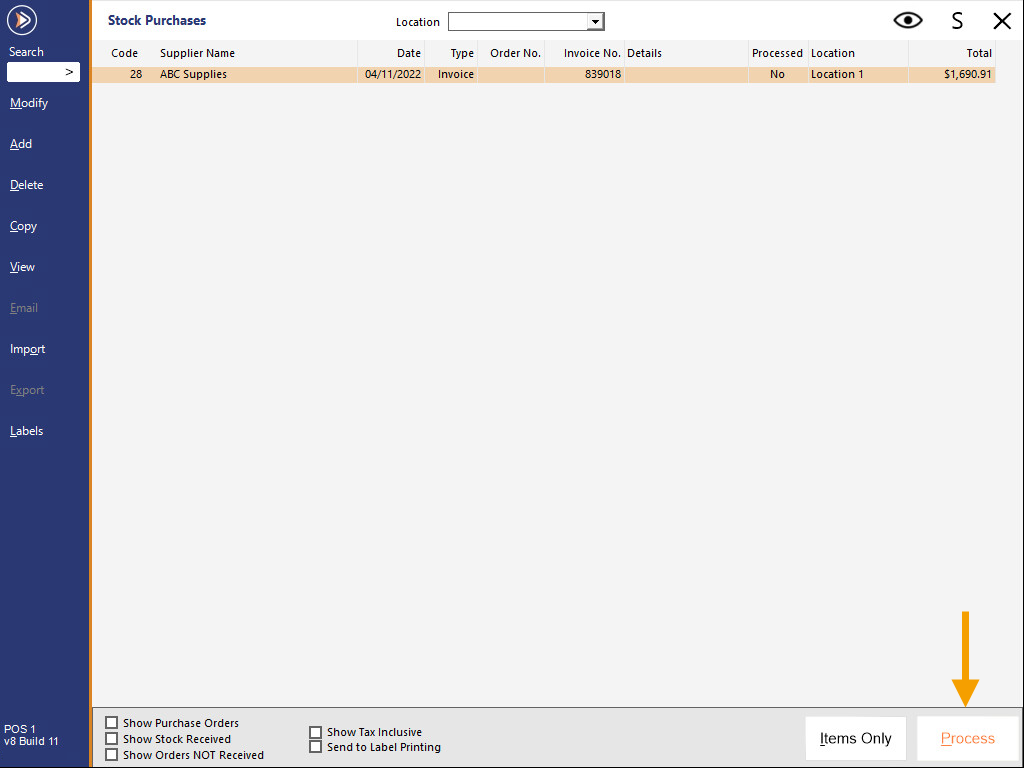
Once processed, the Invoice listing will disappear from the Stock Purchases.
The Stock Items from the Invoice have been imported and linked to the Department that was configured during the Invoice field mapping process.
The Tax Settings for each newly created Stock Item will be set according to the Default Tax Rate of the Supplier.
Merging New Items based on Description/Price
This function enables the ability to merge new Stock Items based on their Description and Sell Price.
When Importing an Invoice, the option 'Add New Stock Items' is used to create new Stock Items in Idealpos from the Items in the Invoice.
Some Supplier Invoices may contain hundreds of items that are similar (such as greeting cards) with slight variations (e.g. Card Deluxe BD Female, Card Deluxe BD Male, Card Deluxe BD Humour, etc.).
If a site doesn't want each of these items to be created in Idealpos as individual Stock Items, they can be merged during the Import of the invoice using this merge function.
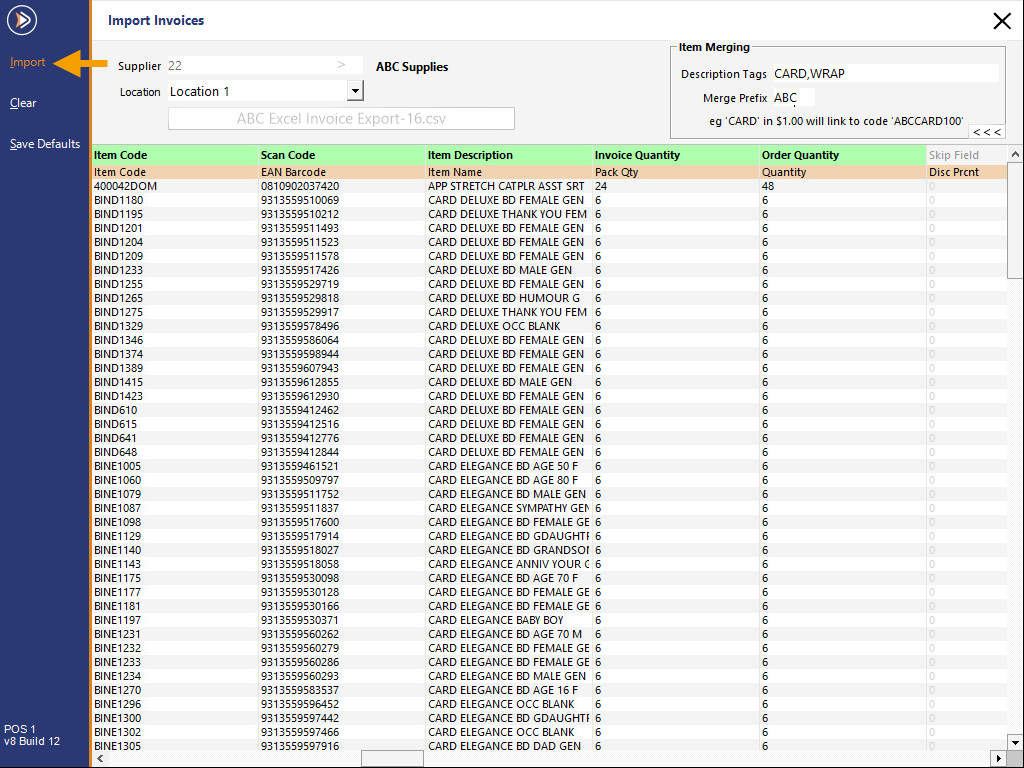
The items will be merged based on the 'Description Tags' and 'Merge Prefix' entered within the 'Import Invoices' window (these settings are entered before the import of a Supplier Invoice).
E.g. Entering "CARD,WRAP" into the 'Description Tags' field and "ABC" into the 'Merge Prefix' field will trigger Idealpos to merge any items which have a description that starts with "CARD" or "WRAP".
The Description Tag, Merge Prefix and Stock Item's Sell Price will each be used as the Stock Code for the merged items.
E.g. Card Deluxe BD Female, Card Deluxe BD Male, Card Deluxe BD Humour all have a Sell Price of $2.00.
Therefore, these items will be merged into a single Stock Item with a Stock Code of ABCCARD200.
Any other Stock Items that also have a description starting with "Card" but a sell price of $3.00 will be merged into another Stock Item with a Stock Code of ABCCARD300.
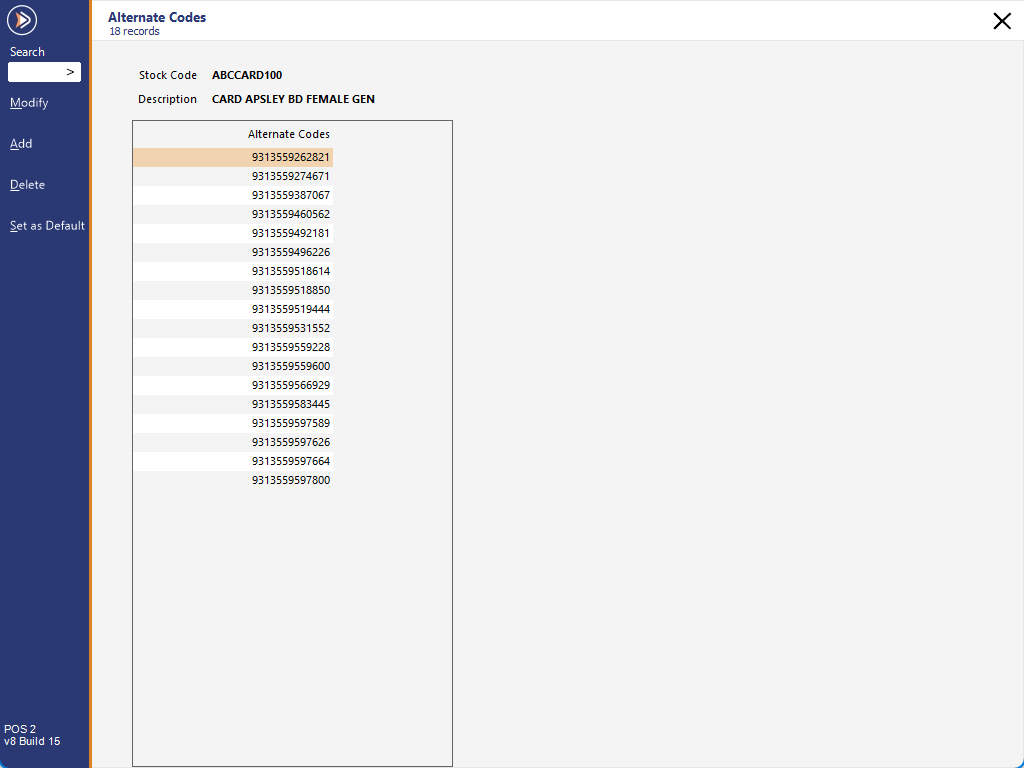
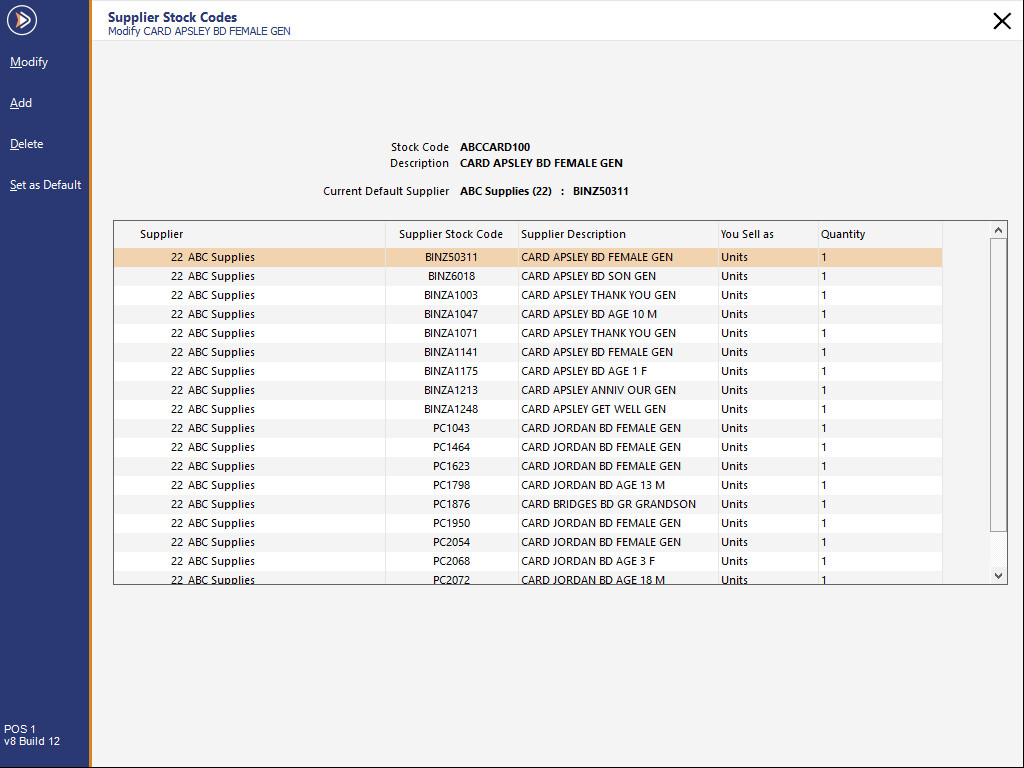
As each Stock Item that is merged will contain other details that are unique to each item (such as a Scan Code and Supplier Code), these Scan Codes will be added as Alternate Codes to the merged item, and the Supplier Code for each item will be added as Supplier Stock Codes to the merged item.
The retention of the Scan Codes and Supplier Codes will enable the items to be scanned as well as enabling the items to be ordered again from the Supplier by the Supplier Code.
To use this function, go to: Back Office > Transactions > Stock Control > Stock Purchases > Import.
The Import Invoices window will open.
Select a Supplier by pressing the '>' button in the Supplier field.

Select a Supplier from the Suppliers list > OK.

The Import Invoices window will reappear and will display the selected Supplier in the Supplier field.
Ensure that the 'Add New Stock Items' checkbox is enabled and a Department for the new Stock Items is selected.

Once the required options have been selected, press the '>>>' button on the right-hand side of the Import Invoices window.
Note!
If using a widescreen resolution monitor (e.g. 1920x1080), the ">>>" button will not appear.
The Item Merging options will be shown on the right-hand side of the window.

The Item Merging function will be displayed which can be used to configure the Description Tags and Merge Prefix.
These settings will be used to determine which Stock Items are going to be merged based on their Descriptions.
Items that are merged as part of the Import Invoice process will have their Stock Codes in Idealpos set based on the Description Tag, Prefix and Sell Price (this information is retrieved from the Invoice).
E.g. The Item Merging - Description Tags is populated with "CARD' and the Merge Prefix is populated with "ABC".
When an invoice contains three items with descriptions of Card Deluxe BD Female, Card Deluxe BD Male, Card Deluxe BD Humour and these items have a Sell Price of $2.00, these items will be merged into a single Stock Item with a Stock Code of ABCCARD200.
ABC is the Merge Prefix, CARD is the Description Tag, and 200 is the Sell Price without a decimal place.
When configuring the Description Tags, multiple tags can be entered as a comma separated list (e.g. CARD,WRAP).

If the Item Merging function with the configured Description Tags and Merging Prefix is required for all future invoices from this Supplier, the 'Save Defaults' button can be pressed (left-hand side) and anytime this Supplier is selected, new Items in the Supplier Invoice will be created and merged as per the configured Item Merging settings.
Press the 'Select Import File' button to continue.

Browse to a folder that contains the Supplier Invoice, select the Invoice file and press 'Open'.
The Supplier Invoice is displayed.
Note that if the fields from the Supplier Invoice have not been mapped, this will need to be done before importing the Supplier Invoice. For more information, refer to the section Mapping the fields in the Supplier Invoice on this page.
This can be done by clicking on each of the headings in the Import Invoices window and selecting the Idealpos data type that corresponds to the data shown in the column below.
Any columns in the invoice that do not have a corresponding data type in Idealpos can be skipped via the 'Skip Field' option.
To continue with the import, press the 'Import' button.
While the invoice is importing, a progress bar will be displayed within the button that contains the filename of the Supplier Invoice.

After the Invoice is imported, the main Stock Purchases window will be displayed and will show the newly imported Supplier Invoice.
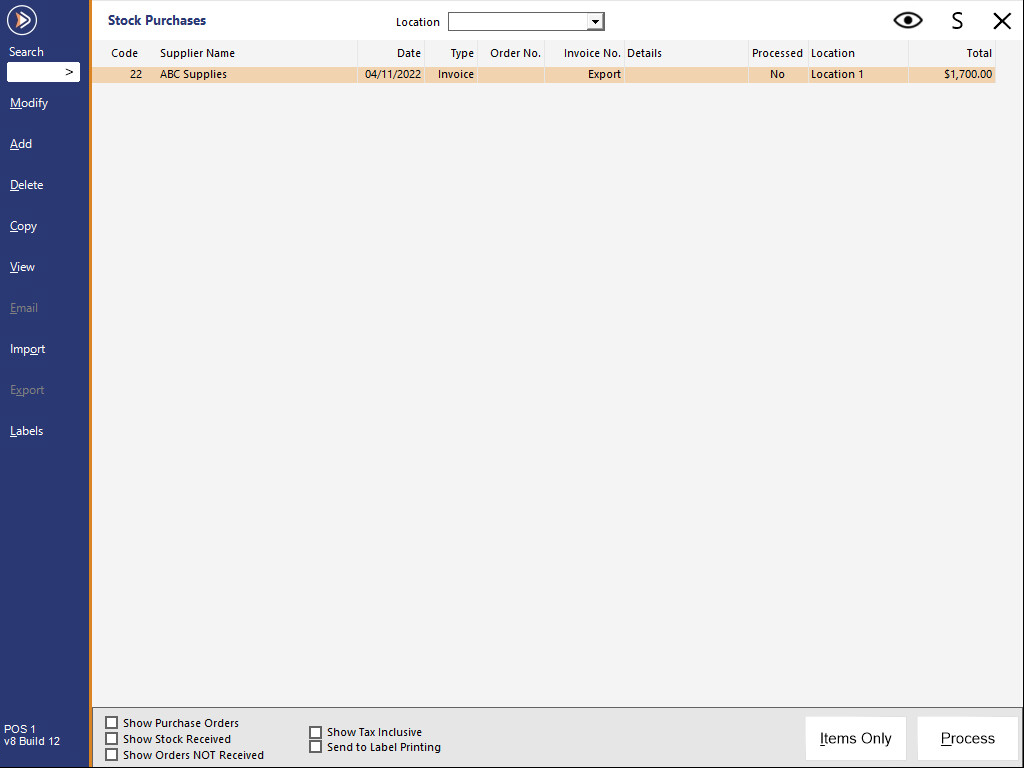
Ensure that the Invoice is selected and press the 'Modify' button.

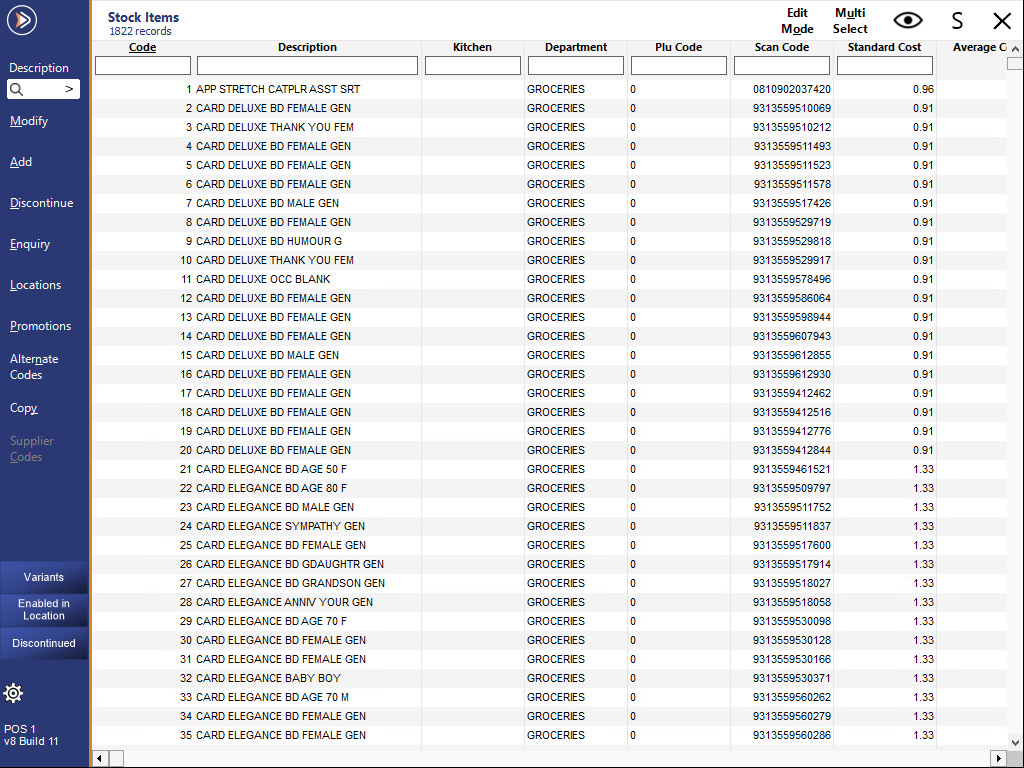
The below example shows the Stock Items that have been merged (ABCCARD200, where ABC is the Merge Prefix, CARD is the Description Tag and 200 is the Sell Price without a decimal place).
When going to Back Office > File > Stock Control > Stock Items > Code > Enter ABCCARD, the newly created Card Stock Items are displayed.

Selecting one of these Stock Items from the Stock Items grid and pressing the 'Alternate Codes' button (located on the left-hand side of the Stock Items grid window) will show all the Alternate Codes (these are the Scan Codes of the merged Stock Items).
Selecting one of these Stock Items from the Stock Items grid and pressing the 'Supplier Codes' button (located on the left-hand side of the Stock Items grid window) will show all the Supplier Codes (these are the Supplier Codes of the merged Stock Items).
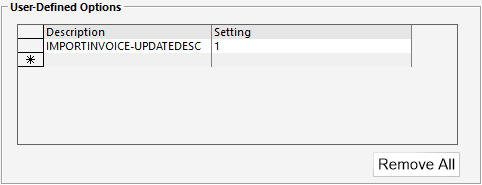
Update existing Stock Descriptions (User-Defined)
When an existing Stock Item in a Stock Purchase has an updated Description from the Supplier, the Description for the corresponding Stock Item in Idealpos will have its Description updated when this option is enabled.
To enable this function, go to: Back Office > Setup > POS Terminals > Select a POS Terminal > Modify > POS Settings tab > User-Defined Options
Create a User-Defined setting as follows:
Description: IMPORTINVOICE-UPDATEDESC
Setting: 1